Zenity Integration Guide for Endpoint Agent
Zenity’s Endpoint Agent is a lightweight service running on Windows & MacOS devices, that provides organizations with enhanced shadow AI discovery, threat detection & real-time protection capabilities directly on endpoint devices.
This guide walks you through installing and configuring Zenity’s Endpoint Agent on your enterprise devices using an enrollment key provided to you by Zenity.
Prerequisites
Before you begin, make sure you have:
- Zenity Administrator access to create the Devices integration
- Access to a Unified Endpoint Management (UEM) platform (e.g., Microsoft Intune, JAMF)
- Administrative privileges on target devices
- For Windows: Ability to deploy MSI packages via UEM
- For MacOS: Ability to deploy PKG files and mobile configuration profiles via UEM
Supported Platforms
| Endpoint OS | Deployment Options |
|---|---|
| Windows | - Microsoft Intune - Local Script (Requires admin permissions) |
| MacOS | - Microsoft Intune - JAMF - Local Script (Requires admin permissions) |
1. Create the Integration in Zenity
If you don’t already have a Devices integration configured in your Zenity account, follow these steps to create one.
Step 1.1: Access Zenity Integrations
- As a Zenity Administrator, go to the Zenity Integrations page .
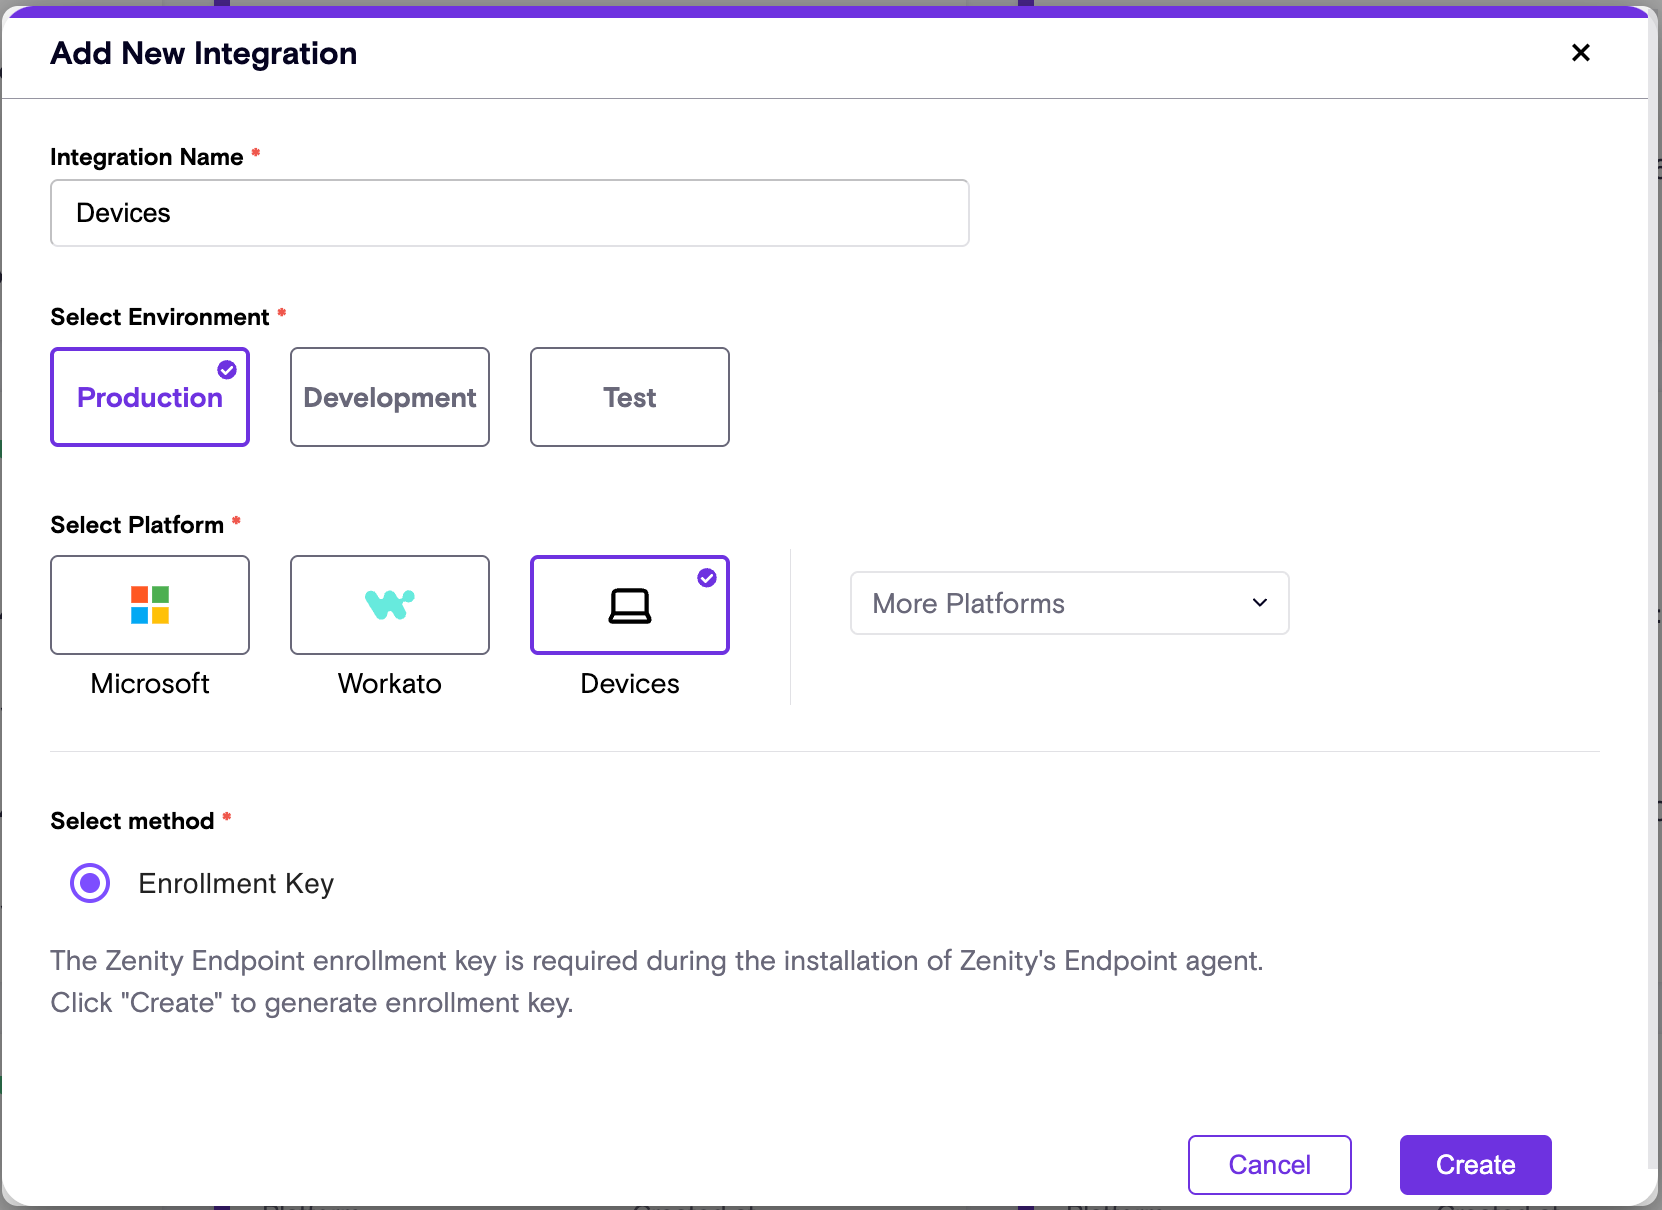
Step 1.2: Create a New Devices Connector
- Click Create Integration in the top-right corner.
- Enter a name for the connector.
- Select the environment (Production, Development, or Test).
- Choose Devices from the list of available connectors.
Step 1.3: Obtain the Enrollment Key
Once the connector is created, an enrollment key will be generated for your Zenity account and will be available in the connectors panel. (If you already created the connector, click the 3 dots and choose Edit to download the agent and view the enrollment key.)
- Copy this enrollment key - it will be required as a parameter during the device agent installation.
- The enrollment key is used to validate your license and associate onboarded devices with your Zenity account.
- You can also download the latest installer from the Devices connectors panel.
Step 1.4: Obtain the Installer(s)
Download the latest versions of Zenity’s Endpoint Agent Installers from the Devices connector panel in Zenity.
2. Deploy the Endpoint Agent
The Endpoint Agent supports interactive installation which is recommended for initial installs during Proof of Concepts as it takes the user through the steps and tests the connection to Zenity.
Interactive Windows Device Installation
Step 2.1: Install the Agent
To install the agent, local administrator rights will be required.
-
Double-click the agent installer.
-
When prompted by Windows User Account Control, enter an account with local Administrator rights or click yes if the user already has them.
-
The first page of the installer prompts for the Enrollment Key and Environment.
-
The Ignore all proxy settings can be used if the agent is picking up proxy settings from the operating system and it needs to connect directly without them.
-
The Proxy field should be configured if the agent needs to use a proxy server to get to the internet. Note, the agent does not support proxies that require authentication.
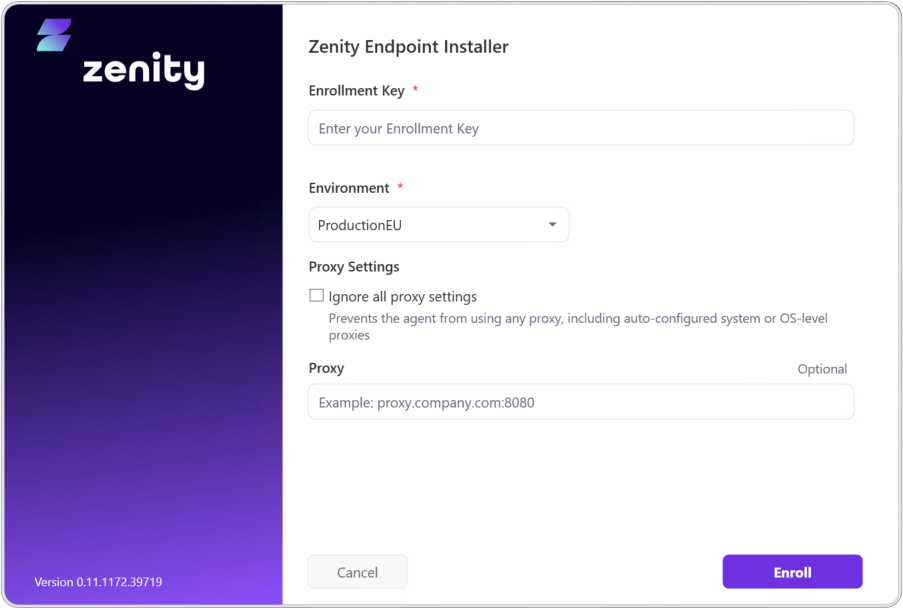
-
Click Enroll - if the enrollment key is incorrect or is not for the Environment selected, the user will be warned.
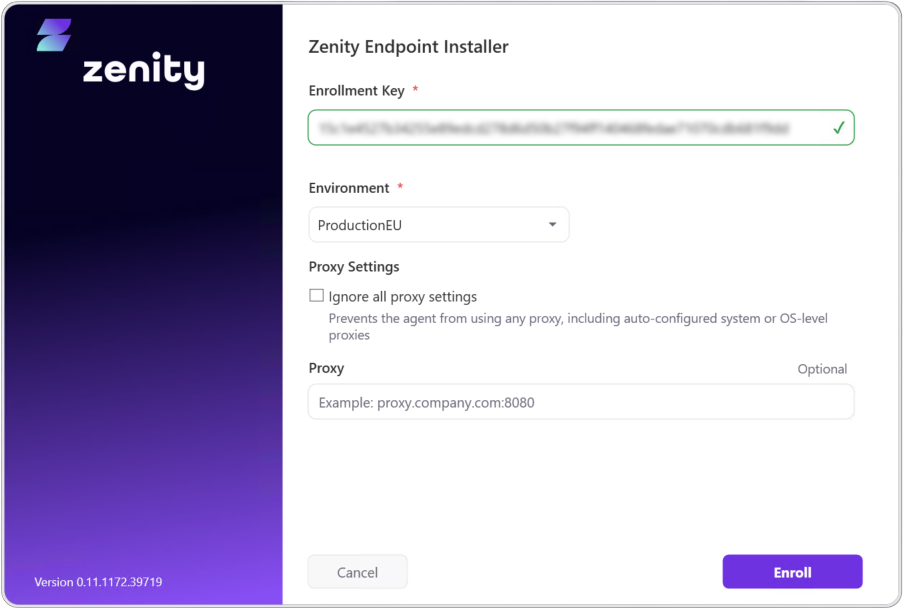
-
If the enrollment key is a valid format a green check should be displayed and then once the other fields are completed the user should click Enroll. Provided enrollment is successful, the next page is displayed.
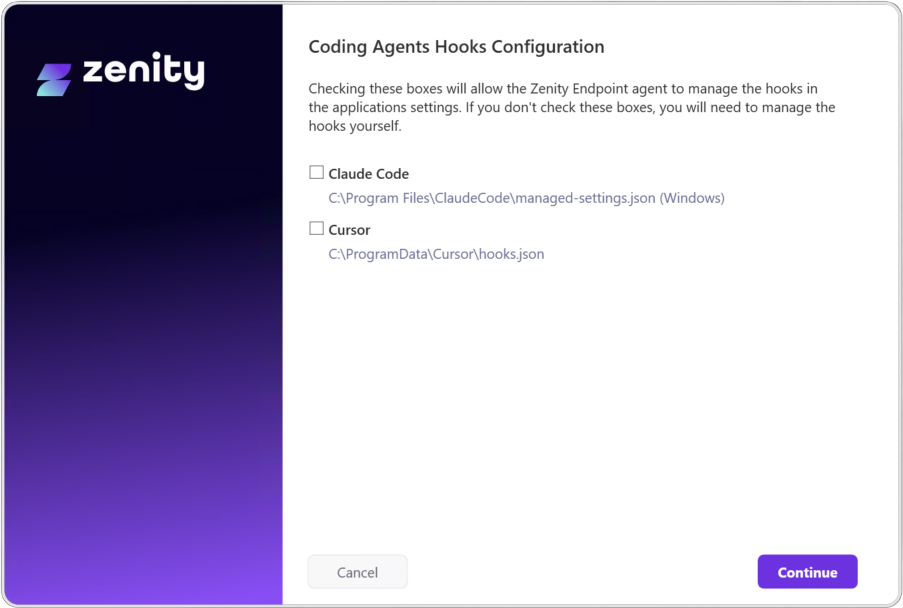
-
Next step is to tell the agent if you want the agent to manage the settings files for Claude Code and Cursor. If you allow the agent to manage them, it will automatically create or edit the managed settings files to add the Zenity Hooks.
Note that the current version of the agent cannot manage hooks in Claude Code if installed in the Windows Subsystem for Linux (WSL) and you will need to follow the manual install instructions in the section below.
If you choose to manage them yourself, you will need to add the following to your existing settings:
Claude Code
The standard location is C:\Program Files\ClaudeCode\managed-settings.json
{
  "hooks": {
    "PreToolUse": [
      {
        "matcher": "*",
        "hooks": [
          {
            "type": "command",
            "command": "C:/PROGRA~1/Zenity/ENDPOI~1/ZENITY~1.EXE cc"
          }
        ]
      }
    ],
    "PostToolUse": [
      {
        "matcher": "*",
        "hooks": [
          {
            "type": "command",
            "command": "C:/PROGRA~1/Zenity/ENDPOI~1/ZENITY~1.EXE cc"
          }
        ]
      }
    ],
    "UserPromptSubmit": [
      {
        "matcher": "*",
        "hooks": [
          {
            "type": "command",
            "command": "C:/PROGRA~1/Zenity/ENDPOI~1/ZENITY~1.EXE cc"
          }
        ]
      }
    ]
  }
}
Claude Code - WSL (Windows Subsystem for Linux) Installations
The agent cannot modify the managed-settings.json file to configure the hooks, so they need to be added manually.
The standard location is /etc/claude-code/managed-settings.json
{
  "hooks": {
    "PreToolUse": [
      {
        "matcher": "*",
        "hooks": [
          {
            "type": "command",
            "command": "/mnt/c/PROGRA~1/Zenity/ENDPOI~1/ZENITY~1.EXE cc"
          }
        ]
      }
    ],
    "PostToolUse": [
      {
        "matcher": "*",
        "hooks": [
          {
            "type": "command",
            "command": "/mnt/c/PROGRA~1/Zenity/ENDPOI~1/ZENITY~1.EXE cc"
          }
        ]
      }
    ],
    "UserPromptSubmit": [
      {
        "matcher": "*",
        "hooks": [
          {
            "type": "command",
            "command": "/mnt/c/PROGRA~1/Zenity/ENDPOI~1/ZENITY~1.EXE cc"
          }
        ]
      }
    ]
  }
}
Cursor
The standard location is C:\ProgramData\Cursor\hooks.json
{
  "version": 1,
  "hooks": {
    "preToolUse": [
      {
        "command": "C:/PROGRA~1/Zenity/ENDPOI~1/ZENITY~1.EXE cr"
      }
    ],
    "postToolUse": [
      {
        "command": "C:/PROGRA~1/Zenity/ENDPOI~1/ZENITY~1.EXE cr"
      }
    ],
    "beforeSubmitPrompt": [
      {
        "command": "C:/PROGRA~1/Zenity/ENDPOI~1/ZENITY~1.EXE cr"
      }
    ]
  }
}-
Click Continue to go to the final page.
-
If you want to set an uninstall password to prevent the user removing the agent, even if they have local administrator rights, you can define it here.
-
The Command Line for silent install gives you the command line equivalent of the options you have chosen during the interactive install. You should copy this so you can use it when you deploy via your MDM solution.
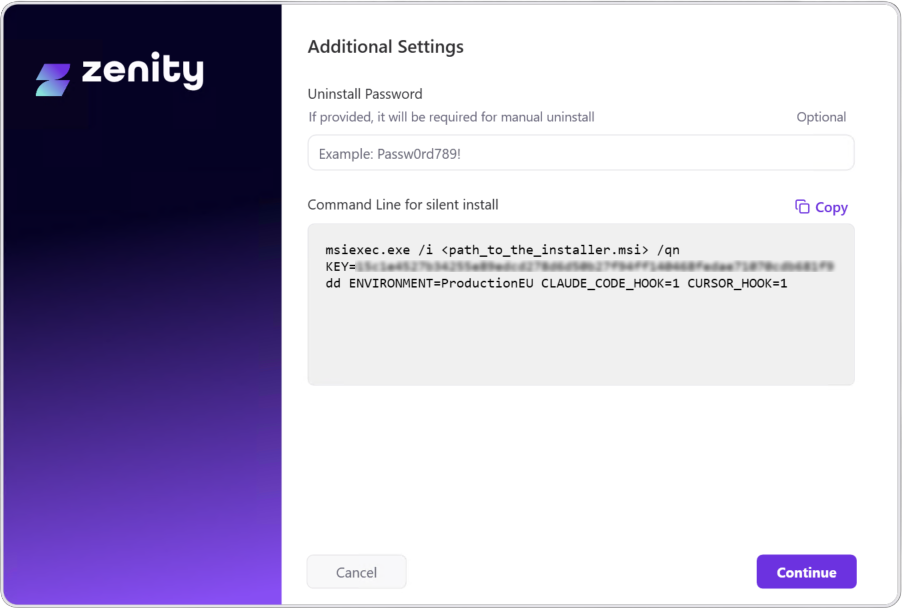
-
Click Continue to complete the installation.
Command line / automated Windows Device Installation
Step 2.1: Deploy the Endpoint Agent
Within your preferred Unified Endpoint Management (UEM) platform:
- Create a new app deployment.
- Select the Zenity MSI package file for installation.
- Most app properties should be automatically populated.
Alternatively, run the following command through your UEM platform, or for local installation - in your terminal with admin permissions:
msiexec /i ZenityInstaller.msi /qn KEY=<YOUR_ENROLLMENT_KEY> ENVIRONMENT=<YOUR_ENVIRONMENT> CLAUDE_CODE_HOOK=1 CURSOR_HOOK=1Replace <YOUR_ENROLLMENT_KEY> with the enrollment key obtained in Step 1.3.
Replace <YOUR_ENVIRONMENT> with ProductionEU or ProductionUS depending on where your environment is configured.
Windows Configuration Options
| Setting | Description | Values |
|---|---|---|
| KEY (required) | Enrollment key provided by Zenity to register the endpoint agent | Your enrollment key |
| ENVIRONMENT (required) | Account environment region | - ProductionEU - ProductionUS |
| CLAUDE_CODE_HOOK | Set this parameter to 1 if you want the agent to manage the hooks in the Claude Code Managed Settings at C:\Program Files\ClaudeCode\managed-settings.json. If you don’t allow this, you have to manage the Zenity Hooks yourself. See the section in the Interactive Install above if you want to manage these yourself. | 1 |
| CURSOR_HOOK | Set this parameter to 1 if you want the agent to manage the hooks in the Cursor Managed Settings at C:\ProgramData\Cursor\hooks.json. If you don’t allow this, you have to manage the Zenity Hooks yourself. See the section in the Interactive Install above if you want to manage these yourself. | 1 |
| UNINSTALL_PASSWORD | For testing purposes, an uninstall password is not required but is strongly recommended for production use to prevent users from uninstalling Zenity’s endpoint agent. | A password set by your administrator |
| IGNORE_ALL_PROXIES | If you need the device to ignore any proxies being set in the operating system use this parameter. | 1 |
| PROXY | If devices connect through a proxy to access the internet it can be defined on the command line. Proxy servers requiring authentication are not supported using this parameter at this time. | Your proxy server address and port e.g. my.proxy.lan:8080 |
For MacOS Devices
Step 2.1: Deploy Mobile Configuration
Create a mobile configuration profile using your UEM platform with the following settings:
Service Management - Managed Login Items
Add a rule to allow the Zenity Endpoint Agent to run as a background service:
| Setting | Value |
|---|---|
| Team Identifier | 6WF298USY6 |
This Team Identifier applies to anything signed by Zenity.
Notifications
Configure notification settings to allow the Zenity Endpoint Agent to display security alerts to end users:
| Setting | Value |
|---|---|
| Bundle Identifier | com.zenity.EndpointAgent |
| Notifications Enabled | Yes |
| Show in Notification Center | Yes |
| Alerts Enabled | Yes |
Deploy this mobile configuration profile to the selected Mac devices using your preferred UEM platform.
This mobile config will whitelist Zenity-signed apps to run as background tasks (daemons) without prompting the user or admin for permission.
Step 2.2: Deploy the Endpoint Agent
Use your UEM platform to deploy the Zenity endpoint agent installer (provided as a .pkg file) as an application. To do that, run the following script:
#!/bin/bash
defaults write com.zenity.EndpointAgent RegistrationCode -string <YOUR_ENROLLMENT_KEY>
Replace <YOUR_ENROLLMENT_KEY> with your actual registration code (enrollment key) provided by Zenity.
You may paste this directly into your UEM platform as a pre-install script, or upload it as a script to be executed before the package installation.
MacOS Configuration Options
Configure MacOS settings using the defaults command, along with the following properties:
| Command | Description | Values |
|---|---|---|
sudo defaults write com.zenity.EndpointAgent RegistrationCode -string <KEY> (required) | Enrollment key provided by Zenity to register the device agent | Your enrollment key |
sudo defaults write com.zenity.EndpointAgent HostingEnvironment -string <ENVIRONMENT> | Set account environment region | ProductionEU ProductionUS |
3. Verify Installation
For Windows Devices
After installing Zenity’s endpoint agent, you can verify the following:
- Application Installed: Check in Windows Settings app under
Apps > Installed Appsfor “Zenity Endpoint Device Agent”. - Service Running: Open the Windows Services app and verify the “Zenity Endpoint Device Agent” service is running.
- Zenity Runtime Protection Enabled: Navigate to any AI service supported by Zenity’s runtime protection and type
ZenitySanityin the prompt. This will trigger a sanity check rule that blocks the request, confirming that Zenity’s endpoint agent is running successfully.
For MacOS Devices
After installing Zenity’s endpoint agent, verify the following:
-
Application Installed: Check for the application at:
/usr/local/bin/zenity/ZenityEndpointAgent.app -
Service Running: Run the following command in Terminal:
sudo launchctl list | grep com.zenityThe service and watchdog should be listed, and the service should have a PID.
-
Zenity Runtime Protection Enabled: Navigate to any AI service supported by Zenity’s runtime protection and type
ZenitySanityin the prompt. This will trigger a sanity check rule that blocks the request, confirming that Zenity’s endpoint agent is running successfully.
Uninstallation
For Windows Devices
Minimal Uninstall (for upgrades)
When upgrading to a new version, use the following command to perform a minimal uninstall that preserves your existing configurations:
msiexec /x {C703772E-806E-4A36-91A0-451BF47968E9} /qnNote: Due to anti-tampering defenses, this command cannot be run directly on the device, even with administrator privileges. To enable local users to uninstall the agent, an uninstall password must be set during installation using the UNINSTALL_PASSWORD parameter, and provided here as a parameter.
msiexec /x {C703772E-806E-4A36-91A0-451BF47968E9} /qn UNINSTALL_PASSWORD=<YOUR_ADMIN_PASSWORD>Full Uninstall (permanent removal)
To permanently uninstall with no intention of upgrading or re-installing:
msiexec /x {C703772E-806E-4A36-91A0-451BF47968E9} /qn FULL_UNINSTALL=1For MacOS Devices
To uninstall the Mac Agent, use one of the following options (all require admin password and can be executed through your UEM platform):
Minimal Uninstall (for upgrades)
When upgrading to a new version, use the following command to perform a minimal uninstall that preserves your existing configurations:
#!/bin/bash
sudo /Library/Application\ Support/Zenity/AIEdge/ZenityUninstall.app/Contents/Resources/UninstallZenityAgent.sh
Full Uninstall (permanent removal)
To completely remove all Zenity components, run the following command:
#!/bin/bash
sudo /Library/Application\ Support/Zenity/AIEdge/ZenityUninstall.app/Contents/Resources/UninstallZenityAgent.sh FULL_UNINSTALL
Version Updates
Version updates are performed by uninstalling the current version, then re-installing the latest version of the agent.
Please follow the respective Uninstallation and Deploy the Endpoint Agent sections.
Troubleshooting
Log Locations
| Platform | Location |
|---|---|
| Windows (Installation) | Event Viewer app, under Application Log |
| Windows (Post-installation) | C:\ProgramData\Zenity\Endpoint Device Agent\Logs |
| MacOS | /Library/Application Support/Zenity/Endpoint Device Agent/Logs |